Showing posts with label install. Show all posts
Showing posts with label install. Show all posts
Thursday, April 2, 2015
How To Install CyanogenMod 11 ROM in Sony Xperia Z
Sony Xperia Z is my dream device and is same for almost everyone. I want a device which is water proof, sleek, has good sound quality, better and crisp display and Sony Xperia Z has all the features I need.

Sony Xperia Z is one of the finest devices in the Android world. The device has a 5.0 inch capacitive touch screen display which is dust and water proof display (IP57 certified) up to 1 meter and 30 minutes, which is very nice for people like me who watch movies on their devices and take them everywhere. Multifinger support of this device is awesome. 10 fingers! Yes, you can touch on this device with 10 fingers and it will recognize it. With the full HD Display of 1080 x 1920 pixels, it has 441 ppi pixels density. It has been added with xLoud, Bravia Engine 2 and many other customisations. It is also a gaming mobile phone because it has 2 GB RAM, Qualcomm MDM9215M / APQ8064 (depens on the model) Quad-core 1.5 GHz Krait CPU which guarantees super fast performance. Sony likes Adreno GPU and again, they have added Adreno 320 GPU in Sony Xperia Z for gaming and better graphics. Other specifications are also decent, but I am now going to talk about CyanongenMod 11 ROM.
What are the featuers of CyanongenMod 11 ROM?
The ROM has features that you will never ever get in your Stock or OEM ROMs like Focal, DSP Manager, CyanongenMOD settings, Theme support Modified, zipaligned, faster and stable applications etc.
Why to shift over CyanogenMod 11 ROM?
Sony Xperia Z is one of the finest devices in the Android world. The device has a 5.0 inch capacitive touch screen display which is dust and water proof display (IP57 certified) up to 1 meter and 30 minutes, which is very nice for people like me who watch movies on their devices and take them everywhere. Multifinger support of this device is awesome. 10 fingers! Yes, you can touch on this device with 10 fingers and it will recognize it. With the full HD Display of 1080 x 1920 pixels, it has 441 ppi pixels density. It has been added with xLoud, Bravia Engine 2 and many other customisations. It is also a gaming mobile phone because it has 2 GB RAM, Qualcomm MDM9215M / APQ8064 (depens on the model) Quad-core 1.5 GHz Krait CPU which guarantees super fast performance. Sony likes Adreno GPU and again, they have added Adreno 320 GPU in Sony Xperia Z for gaming and better graphics. Other specifications are also decent, but I am now going to talk about CyanongenMod 11 ROM.
What are the featuers of CyanongenMod 11 ROM?
The ROM has features that you will never ever get in your Stock or OEM ROMs like Focal, DSP Manager, CyanongenMOD settings, Theme support Modified, zipaligned, faster and stable applications etc.
Why to shift over CyanogenMod 11 ROM?
- Bored of stock camera appliaction? Get a new Focal application which has tons of features for camera.
- Bored of stock UI? Get a new look which is customizable a lot! You can customize your notification bar, OSG looks, glows and other UI options.
- Want to change ROMs because you want to change the themes? Get this ROM and change over 1 millions themes all over the world. You can change between many themes in just some seconds.
- Want to get BASS? I like the ROM because actually of DSP Manager. Awesome bass will shake your mind and they are real bass not fake.
Requirements
- Rooted Sony Xperia Z: Click HERE to see how to root Sony Xperia Z.
- Sony Xperia Z with clockworkmod recovery installed in it.
- Nothing else, but just knowledge of using CWM recovery.
Downloads
- CyanongenMod 11 ROM: Click HERE to get it from official CyanongenMod website.
How To Install CyanongenMod 11 ROM in Sony Xperia Z and upgrade it to Android 4.4.2 Kit Kat.
- Download the ROM from your computer.
- Move it to your SD Card without extracting it.
- Reboot your Sony Xperia Z to recovery:
adb shell
su
reboot recovery - After rebooting it to recovery, make a nandroid backup from the main menu.
- Select Wipe data/factory reset option from the main menu and confirm the wipe.
- Select mounts and partitions from the menu and select /format system option.
- From the main menu, select install zip from sdcard option.
- Select the ROM from your SD Card and confirm the flash.
- Wipe user data again.
- Install Google applications, by selecting install zip from sdcard option, selecting the zip and confirming the flash.
- Reboot!
This boot will take more time than the normal boot because system is building some files that are required for the boot. You can comment here if you have any problem or anything you want to ask.

Friday, August 29, 2014
Install Lewa OS in Celkon A119Q Signature HD
This is my first post for Celkon mobiles. Celkon A119Q is a mid-range device with good price amount and features. There are many ROMs for it but Im gonna show you Lewa OS for Celkon A119Q today. Lewa OS is very popular ROM because it is available for almost every MediaTek device. Fortunately, the chipset of Celkon supports Lewa OS. Celkon A119Q is the clone of Mobiistar touch LAI 504 and that ROM is officially for Mobiistar only so developers found it easy to port it to A119Q. Lets see the specifications of Celkon A119Q first-
Specifications of Celkon A119Q-
- Android 4.2 Jelly Bean OS
- MediaTek MT6589 1.2 GHz Quad-Core processor
- 1 GB RAM
- PowerVR SGX 544MP2 GPU
- 4 GB Internal storage. SD card expandable up to 32 GB
- 5.0 inch LCD capacitive touch screen
- 12 Mega Pixels camera & 3 Mega Pixels front camera
- Dual SIM support [Dual Standby]
- 3G, Wi-Fi, GPS, USB, GPRS, Bluetooth
- 2100 mA Battery
The devices specifications are nice and I hope every customer is happy with such a good device. Now, lets move to our ROM that is LeWa OS 5-
Some features of LeWa OS-
- Beautiful and redefiened UI
- Faster than other ROMs
- New cool applications
- Superb notification bar
- Cool lockscreen
- New Settings application
- Beautiful bootanimation
There are many many UI tweaks, speed tweaks etc. but I would say you that the ROM is amazing and you will surely like the ROM.
Prerequiests
- Celkon A119Q with battery charged up to 60%
- Rooted Celkon A119Q
- ClockWorkMod Recovery installed
Note
- Do not install this ROM on any other device except Celkon A119Q.
- Do not stop the installation in between.
- Do not install the ROM before making a Nandroid backup.
Downloads
Lewa OS 5.0 for Celkon A119Q
How To Install LeWa OS 5.0 in Celkon A119Q
- Download the ROM [Note: Do not unzip it because we need to flash it as .zip only]
- Move the ROM to SD card
- Shut down the device completely and remove battery
- After 5-10 seconds, add the battery again so that it doesnt boot automatically into simple mode
- Reboot it to CWM Recovery
- Make a Nandroid Backup
- Wipe the User data and cache partition
- Go to Advance and wipe the dalvik cache
- Install the ROM
- Reboot
The ROM will take more time to boot because the system is building some important files that required. Dont switch the device off. Just wait and relax, everything will be okay. If youre having any doubts on installing this ROM, please shoot a comment here. I am here to help you.
Wednesday, July 16, 2014
How To Install Android 4 4 2 Kit Kat ROM in HTC One X CyanogenMod 11
HTC One is one of the best devices in the list of android devices. The device is not at all AOSP, but stuffed with so many features which makes it an awesome Android device and I am sure you are enjoying your HTC One X? But why just to enjoy it on stock UI? I know the stock UI of HTC One is quite better than of Micromax, Karbonn, XOLO and other chinese brands, but still there are some features that even the stock ROM of HTC One X doesnt have.
HTC One X is a fast device, I mean it has good specifications, but somewhere you might have faced lags, isnt it? It is because of heavy stock UI and to fix this problem, or to replace the stock ROM, I am going to show you how you can upgrade your HTC One X to Android 4.4 KitKat by CyanongenMod 11 ROM.

HTC One has a 4.7 inch display with 312 ppi pixels density and an HD display which makes the device handy and better for gaming. Oh, it also has HTC Sense UI, I forgot to mention this. The screen of HTC One X is protected by Corning Gorilla Glass. Super crisp camera of 8 Mega Pixels allows you to take awesome and bright pictures. Secondary camera can also record HD videos at 720p HD.
Added with Android 4.0 Ice Cream Sandwich, the One X has Nvidia Tegra 3 chipset which is really fast and provides good display. Moving to the CPU, I would like to say that the processor is also very fast. It has a Quad-Core 1.5 GHz. HTC One Xs UI is also provided from Nvidia. It has Nvida ULP GeForce GPU which also enhances gaming experience. There are many other features, which will make this article too long so I will skip them and will move to the ROM.
I have already posted CyanongenMod ROM update for many HTC, Sony and Samsung devices and none of the users have reported any error or issue for the ROM. For example, I posted CM 11 ROM for Sony Xperia Z, Sony Xperia Sola, Samsung Galaxy S I9000, Motorola Moto G, HTC One Mini, Nexus 5. I always post CM ROM because the firmware is highly trustable, I mean I know that the ROM has no issues like of calls, messages etc.
Requirements
HTC One X is a fast device, I mean it has good specifications, but somewhere you might have faced lags, isnt it? It is because of heavy stock UI and to fix this problem, or to replace the stock ROM, I am going to show you how you can upgrade your HTC One X to Android 4.4 KitKat by CyanongenMod 11 ROM.
HTC One has a 4.7 inch display with 312 ppi pixels density and an HD display which makes the device handy and better for gaming. Oh, it also has HTC Sense UI, I forgot to mention this. The screen of HTC One X is protected by Corning Gorilla Glass. Super crisp camera of 8 Mega Pixels allows you to take awesome and bright pictures. Secondary camera can also record HD videos at 720p HD.
Added with Android 4.0 Ice Cream Sandwich, the One X has Nvidia Tegra 3 chipset which is really fast and provides good display. Moving to the CPU, I would like to say that the processor is also very fast. It has a Quad-Core 1.5 GHz. HTC One Xs UI is also provided from Nvidia. It has Nvida ULP GeForce GPU which also enhances gaming experience. There are many other features, which will make this article too long so I will skip them and will move to the ROM.
I have already posted CyanongenMod ROM update for many HTC, Sony and Samsung devices and none of the users have reported any error or issue for the ROM. For example, I posted CM 11 ROM for Sony Xperia Z, Sony Xperia Sola, Samsung Galaxy S I9000, Motorola Moto G, HTC One Mini, Nexus 5. I always post CM ROM because the firmware is highly trustable, I mean I know that the ROM has no issues like of calls, messages etc.
Requirements
- Rooted HTC One X.
- Unlocked HTC One X.
- ClockWorkMod (CWM), Team Win Recovery Project (TWRP) or any other custom recovery.
- HTC One X charged up to 70%.
- Knowledge of using your custom recovery.
Prerequists
- This guide is only meant for HTC One users. If you have HTC One Mini then go here, or if you have any other device then search on our homepage.
- No support will be provided if you did anything wrong which is not mentioned in this guide or article.
- You can edit the contents of this ROM to make some changes based on requirements, but if you did then no support will be provided to you.
- MXRootROM is not responsible for your bricked HTC One X.
- Make sure your ADB and Fastboot works.
Downloads
- CyanongenMod 11 ROM for HTC One X (CyanongenMods official website). Download only the latest or the ROM (.zip) in the top.
- Compressed Fastboot and ADB Tools (made by MXRootROM): Click HERE. We have compressed 500 MB files to just 500 KBs.
How To Upgrade HTC One X to Android 4.4.2 KitKat by CyanongenMod 11 ROM
- Download the ROM to your computer.
- Extract the boot.img from the ROM, but make sure there is boot.img present in the zip after extracting (just extract boot.img, but dont delete it from the main ZIP).
- Push the ROM to your HTC One X and get ready with your USB and computer.
- Reboot HTC One X to the recovery.
- Select Backup and restore and make a nandroid backup by selecting Backup from the menu.
- Select Wipe user data/factory reset option from the main list of options.
- Open Mounts and partitions option and select format /system option.
- Go back to the main menu and select advanced option.
- From advanced, select wipe dalvik cache.
- Select flash zip from sdcard from the main menu of CWM recovery.
- Move to the ZIP and select it.
- Flash the ROM by confirming it.
- Flash the GApps too (if you want too.)
- Shut down the device (yes, dont reboot it!!!!)
- Press and hold down the Volume Down and Power keys simultaneously for a while.
- Soon it will be in bootloader mode.
- Plug in the USB to your HTC One X and computer.
- Extract the compressed ADB and Fastboot tools to a folder on desktop or anywhere.
- Also copy and paste the boot.img which you extracted some where in the folder where the compressed ADB and Fastboot tools are extracteed.
- Hold the Shift key and press right click on the folder in which you extracted the compressed ADB and Fastboot tools.
- Click on Open command prompt here.
- Now type this in the black window (Command prompt):
fastboot devices (hit enter after typing)
fastboot flash boot boot.img (hit enter after typing)
fastboot reboot (hit enter after typing) - Done!
The bootscreen may take 2-3 minutes to appear because we just flashed the Boot image and it takes time to boot. This will be only for the first time! The second, third or any boot will be faster than the first boot.
You can shoot your comments here if you want to ask any question or if you are stuck anywhere.
Friday, July 4, 2014
How To Install Flash ClockWorkMod CWM Recovery in Micromax A250 Canvas Turbo
Rooted your Micromax A250 Canvas Turbo? Thats cool, but what you will do with the root if you feel insecure before installing applications like Cf3D that might brick your device? For that you need to backup your device. You might be thinking why I need ClockWorkMod Recovery when I can easily backup my MediaTek device with MtkDroidTools and other tools specially made for MTK, but what will you do if your computer crashes and your hard disk gets corrupted? Just a simple solution: backup and restore your Android on Android means no need for connecting your device to computer by USB! Just backup and restore with your mobile. After restore, everything will be like that when you left your device before backup and the best part of this is, that even if your device is not booting into Android or you facing bootloop then also you can restore it easily. And when you will be backed up, then you can try anything on your device like Xposed modules, flash some MODs and other features. I know you are excited! Even I am to show this. And yeah, this is a very simple guide and even a noob can do this. So let us begin this.

Downloads
Please Click here to download CWM for Micromax A250 Canvas Turbo.
Requirements
The name of that application..
You need to download mobileuncle mtk tools application from Google Play Store in your device.

How To Flash/Install ClockWorkMod [CWM] in Mircomax A250 Canvas Turbo
Downloads
Please Click here to download CWM for Micromax A250 Canvas Turbo.
Requirements
- Google Play Store: To download a simple application.
- Micromax A250 Canvas Turbo: To flash the CWM.
- Rooted Canvas Turbo: To use that application which will flash the recovery and that requires root!
- Nothing else.
The name of that application..
You need to download mobileuncle mtk tools application from Google Play Store in your device.
How To Flash/Install ClockWorkMod [CWM] in Mircomax A250 Canvas Turbo
- Download the CWM Recovery [Link in Downloads section]
- Move that recovery to your SD Card and rename it to recovery, make sure there is .img extension after the name.
- Open the application that you just downloaded [mobileuncle MTK Tools].
- Grant root permissions to it.
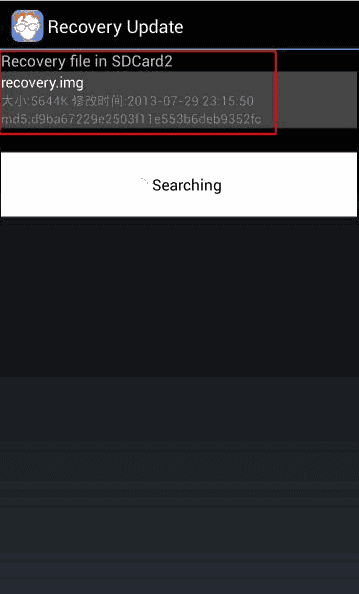
- Select Update recovery from the menu.
- It will display your recovery.img soon.
- Click on it, and it will prompt to flash it or not. Click Yes.
- It will flash the recovery. After it is flashed, there will be a popup to reboot your device to recovery or not. Thats on you.
- Done!
Now, how to open the recovery console in Micromax A250 Canvas Turbo.
Press and hold Power + Volume Up/Down buttons simultaneously for some time and then you will be in Recovery mode. [First try with Volume UP, if it ends in Fastboot mode then remove the battery and then press and hold Power and Volume Down button, it will work!] Comment here which key combination worked for you to boot in Recovery console in Micromax A250 Canvas Turbo. Power button means Select, Volume Up means go up and down means go down.
Hope it helped you! :)
Saturday, June 14, 2014
ClockWorkMod CWM Recovery port for Micromax A77 Canvas Juice How To Install it
Finally after too much wait Micromax A77 Canvas Juice has got a ClockWorkMod (CWM). After being first to post rooting guide for Micromax A77 Canvas Juice we are first to post CWM Recovery for Micromax A77 Canvas Juice too! The recovery is ported by me using Rua1s tool for porting CWM Recovery. I also have ported the Carvil Touch Recovery for this device but my tester was busy and he couldnt check. The recovery is simple and does not support touch feature (if you want to use Touch Featured CWM Recovery, then download Carvil Recovery Porter and make a touch recovery for yourself. I have made that recovery too but I cannot test because of my tester. Making a Carvil Recovery is very easy. Just Open the tool, click on Auto and attach your USB (make sure ADB works) and it will automatically port a recovery for you. Wait, we are here for CWM recovery and NOT for Carvil Touch Recovery for Micromax A77 Canvas Juice.

Here are some features of ClockWorkMod Recovery:
Here are some features of ClockWorkMod Recovery:
- Backup and Restore: You can backup your currect ROM and restore afterwards, anytime. The backup is made on your own SD Card so you can restore anytime. Even the launchers icons will be there only, at their position.
- Flashing a ROM: You can flash a ROM easily by CWM Recovery because it doesnt need any signed ROM or MOD, just flash and go but NEVER FLASH A ROM NOT MEANT FOR YOUR DEVICE.
- Format Partitions: Before flashing ROMs like CyanogenMod, MiUi, LeWa OS, it is required to format the system partition, so you can easily format the partitions (BUT NEVER FORMAT ANY PARTITION UNTIL YOU ARE A EXPERIENCED USER OR HAVE ANY BACKUP)
- Mount SD Card: You can mount your SD Card while in CWM Recovery, copy, cut, paste your files from computer to SD Card or vice-versa.
Lets see Requirements, downloads and other things to flash recovery in Micromax A77 Canvas Juice.
Requirements
- Rooted Micromax A77 Canvas Juice
- Canvas Juice Juices up to 70%
- Recovery image (download link given below)
- MobileUncle MTK Tools (link given of Play Store)
Downloads
- Click HERE to download CWM Recovery for Micromax A77 Canvas Juice
- Download MobileUncle MTK Tools from Google Play Store
How To Flash/Install CWM (ClockWorkMod) Recovery in Micromax A77 Canvas Juice
- Download the recovery from your computer.
- Move the Application to your SD Card via USB or Bluetooth from your computer.
- Rename cwm_canvas_juice.img to recovery.img and push it to your INTERNAL SD CARD! (Dont push it in your external SD Card)
- Install MobileUncle MTK Tools from the Play Store and open it from your application drawer.
- Grand SuperSU or SuperUser permissions to the application.
- Click on Update Recovery option and it will collect all .img files from your SD Card.
- Now when your recovery.img will be available, just click on that. It will display a popup for flashing it or not, just click yes.
- It will flash/install the recovery in your Canvas Juice in just some seconds. After the flashing finishes, it will display a popup for rebooting device to recovery or not. Just press yes again to reboot to recovery.
- Make a Nandroid Backup (Optional)
How to reboot Micromax A77 Canvas Juice to recovery / How To open recovery console of Micromax A77 Canvas Juice
Method 1:
- Open Terminal Emulator Application.
- Type su and hit enter.
- Type reboot recovery and hit enter.
- Done!
Method 2:
- Open ADB (Android Debugging Bridge).
- Type adb shell and hit enter.
- Type su and hit enter.
- Type reboot recovery and hit enter.
- Done!
Method 3:
- Open MobileUncle MTK Tools.
- Click Reboot to recovery.
- Press Yes.
- Done!
Method 4:
- Shutdown the device.
- Press and hold the Volume down and Power button.
- It will display many options like Fastboot, recovery etc.
- Scroll down (by volume rockers) and tick recovery.
- Done!
Soon, I will post Carvil Touch Recovery for this device as well. Stay tuned! :)
Friday, May 16, 2014
How To Install Flash Carliv Touch Recovery CWM in Micromax A117 Canvas Magnus
Micromax A117 Canavs Magnus gets a CWM Recovery, oh sorry, not cwm recovery but Carliv Touch Recovery.
Carliv Touch Recovery is popular among MediaTek Android devices because it can be ported to almost any MediaTek device without any decompiling and other things. Credits goes to Carliv for making this simple tool and yuweng for his excellent work on his recovery. This is latest recovery complied by Carliv and there are all features which a recovery should have liek touch, nandroid, swipe etc. The recovery is touch based recovery so no need for touching your buttons and thats the best part of the recovery. Not only the touch feature, but you get swiping feature, touch-to-flash-rom feature, Nandroid backup, Nandroid backup deleter (in the recovery itself), backup format changer, Aroma File Explorer and other tons of special features in it. Let me show you aggregate features of Carliv Touch Recovery.

Features


.png)
.png)
Carliv Touch Recovery is popular among MediaTek Android devices because it can be ported to almost any MediaTek device without any decompiling and other things. Credits goes to Carliv for making this simple tool and yuweng for his excellent work on his recovery. This is latest recovery complied by Carliv and there are all features which a recovery should have liek touch, nandroid, swipe etc. The recovery is touch based recovery so no need for touching your buttons and thats the best part of the recovery. Not only the touch feature, but you get swiping feature, touch-to-flash-rom feature, Nandroid backup, Nandroid backup deleter (in the recovery itself), backup format changer, Aroma File Explorer and other tons of special features in it. Let me show you aggregate features of Carliv Touch Recovery.
Features
- Can be ported to any MediaTek based android device easily.
- Touch support- so no need to touch your buttons.
- Touch buttons (you can use on screen touch buttons like in ICS/JB ROMs too!)
- Change backup format- you can change the backup format like .ext4, .img etc.
- Aroma File Manager- use your SD Card, view files on your SD Card, System partition, data and all partitions, also you can delete any of them (thanks to amarullz for his fantastic work)
- Nandroid backup- backup your current ROM (system, data, boot, recovery and other partitions)
- Swiping feature- swipe up, down, left or right for moving in recovery.
- Delete Nandroid backup in recovery itself.
Requirements
- A Rooted Micromax A117 Canvas Magnus: Click HERE.
- Battery charged up to 70%.
- Simple knowledge of installing and using Android applications.
- MobileUncle MTK Tools.
Get it here:
Please note..
I am not responsible if you bricked your Canvas Magnus while performing the tutorial in this website. I hold no responsibility for it. You may make a backup by MTK Droid and tools for a safety purpose but it is tested by many users so you can also give it a shot. After flashing recovery, whatever you flash, I wont help you in that but make sure to make a Nandroid backup before flashing anything.
Downloads
- Carliv Touch Recovery image: Please click here to download carliv recovery 6.0.44 for Micromax A117 Canvas Magnus
Screenshots
Thanks Carliv for providing us the screenshots!
The recovery is based on CWM recovery so you also get features of ClockWorkMod Recovery too.
How To Install Carliv Touch Recovery in Micromax A117 Canvas Magnus
- Download the recovery.
- Rename it to recovery.img (make sure theres a .img extension with it.)
- Push it to your External SD Card of Canvas Magnus.
- Open MobileUncle MTK Tools.
- Click on Recovery update.
- It will automatically find the recovery in your SD Card.
- Click on recovery.img and it will give you a warning to flash it or not.
- Press OK.
- It will start flashing the recovery.
- When it will complete, it will display a message on reboot to recovery? Press OK. [optional]
- You will be in the recovery. Now open Backup and restore and click on backup. [optionl]
- Go back and click on Reboot system. [optional]
- DONE!
Now you are done with the recovery. Do anything with it but make sure you are backed up and do not format any partition if you dont know what does it means!! Especially preloader. You can also try many mods like Kings Booster etc. but make sure you are backed up! Have a good day and stay tuned to us.
Thursday, April 3, 2014
How To Install SamFlare v2 Custom ROM in Micromax A116 Canvas HD
Earlier I posted CanvaS4 ROM for Micromax A110 Canvas 2 but this time I will show you a S4 like ROM for Micromax A116 Canvas HD! TouchWiz UI is liked my many people because it looks clear, white, bright and neat. Many of us wants to buy a Samsung device because of its UI but what if you can get it in your Micromax A116 Canvas HD? Isnt it cool? Okay, the ROM is based on Android 4.2.2 and is bug-less. The ROM is optimized for better performance. Canvas HD has many many ROMs because of its popularity. The device boasts 5 Inch screen, 1.2 GHz Quad Core processor, 8 MP camera. Lets have a specification list of this device.
Specifications of Micromax A116 Canvas HD
Specifications of Micromax A116 Canvas HD
- MT6589 Chipset
- 1.2 GHz Quad-Core Cortex-A7
- 4.1.2 Jelly Bean OS [Upgradable to 4.2.2 Jelly Bean]
- 5 Inch HD IPS display
- 720 x 1280 pixels
- 1 GB RAM
- PowerVR SGX544 GPU
- 8 Mega Pixels rear camera with 3264 x 2448 pixels, autofocus & LED flash and front camera
The devices specifications are good when we compare it with the devices releasing now-a-days. Canvas HD was released in early 2013. HD is a successor of Micromax A110 Canvas 2.
You can install this custom ROM with TWRP [Team Win Recovery Project] or CWM [Clock Work Mod]. You can get many good ROMs for this device like Lewa etc but this ROM is self-made and faster than other ROMs. Dont worry for the flashing guide. I will be guiding you for each and every step so it will be easy for newbies too!
Lets begin our journey with the features of ROM.
Features of SamFlare v2 ROM for Micromax A116 Canvas HD
Some screenies!
.jpg)
.png)
.png)
.png)
Lets begin our journey with the features of ROM.
Features of SamFlare v2 ROM for Micromax A116 Canvas HD
- Flare Lockscreen
- Note 3 Like UI!
- S4 like Launcher
- S4 like Quick-Toggles
- Dual SIM working
- Air Gestures
- S4 like Task Manager
- Swipe to call
- Swipe to message
- S4 like Battery icons
- S4 like framed Framework
- S4 styled notifications
- S4 based Alarm application
- S4 Wallpapers
- S4 Tabbed Settings Menu
- S4 like UI sounds
- S4 SMS
- S4 Dialer
- X-Reality Engine
- Awesome Beats
- Deodexed
- Zipaligned
- Init.d scripts
- BusyBox
- Tweaks for Faster Streaming
- Internet Tweaks
- Signal Tweaks
- Pre-Rooted
- Bash
- Nano
The developer, in version 2 added Note 3 based some applications, Note 3 Sounds, Note 3 effects and it looks like Note 3 ROM now. The ROMs UI is really good and Im sure you would love this ROM if you are a fan of TouchWiz UI.
Some screenies!
How To Install SlamFare v2 Custom ROM in Micromax A116 Canvas HD
- Download the ROM in your PC [I would suggest you with IDM or FDM because in Chrome/FireFox, it sometimes fails].
- Move the Micromax A116 Canvas HD SamFlare v2.zip file to SD card without unzipping it!
- Shut down your Canvas HD properly and remove the battery.
- Re-plug the battery after 10 seconds so that it doesnt boot automatically.
- Now press and hold down Power button, Volume- (Minus) button and Volume+ (Plus) button for a while until it boots to the recovery.
- Make a Nandroid backup. To do this do the following things:
Go to Backup/Restore and hit Backup. The process will complete in some minutes [Important Step]. - Go back to Recovery menu and select Data/Factory Reset.
- Now go to Mounts and Storage from the Recovery Menu and there click on Format /System. [Do not format anything else!]
- Go to Advance and format the Dalvik Cache too.
- Select Install From SD and select Micromax A116 Canvas HD SamFlare v2.zip file from the SD card and press Yes.
- Reboot your device!
Downloads and Requirements
- SamFlare v2 Custom ROM for Micromax A116 Canvas HD
- Canvas HD Changed up to 70%.
- ClockWorkMod Recovery/TWRP Recovery.
Troubleshooting
- The ROM is not booting up- If it is the first time then wait for 5 minutes. If the ROM still doesnt boot then follow these steps again.
- How To Remove the Sidebar permanently- Go to Root Explorer [An application, download it from Play Store] open the System folder. Then open App folder from System folder. Locate and Delete Sidebarservice.apk.
- You cannot use camera upto 6 Mega Pixels- Open the Camera Application, ope its settings. Change the preview from Full Screen to 4:3.
So did everything worked good? I hope you got everything and you can install the ROM easily. You can still comment here if youve any problem while installing the ROM.
Subscribe to:
Posts (Atom)